
Solar and Roofing Integration: A Complete Expert Guide for 2026
When homeowners start exploring rooftop energy, the first big lesson is that solar and roofing decisions cannot be made in isolation. The panels above and the shingles below share the same structure, the same weather exposure, and often overlapping warranty obligations. For decades, homeowners were trained to treat rooftop solar as a separate purchase, something a panel installer handled long after the roofer was gone. That logic is breaking down fast.
A photovoltaic array can sit on your roof for 25 to 30 years, often outlasting the asphalt shingles or metal panels beneath it. When the covering needs replacement and the panels still have life left in them, the cost to remove, store, and reinstall those panels can run several thousand dollars. The cleanest plan is to evaluate the system as one envelope from day one, so the materials, lifespan, structure, and warranty all line up.
That single coordination decision drives almost every other choice in the project. It determines whether you reroof first, whether your installer needs to upgrade the decking, what mounting hardware actually works with your shingle profile, and how your homeowner’s insurance treats any future damage. We cover all of it below, drawing on years of crew experience installing roofs designed to host arrays for the long haul.
Evaluating Your Roof Before You Order Panels
Before any contractor talks to you about panel counts and kilowatt output, the roof itself has to pass three tests: orientation, pitch, and shading. Skip any one of these and the array will underperform for its entire service life.
Orientation
Roof orientation plays a major role in how much sunlight the panels can capture throughout the year. In most parts of the continental United States, a south-facing roof slope typically delivers the strongest overall solar production because it receives the most consistent sunlight.
Southeast and southwest slopes can also perform well, especially when they have fewer obstructions or better roof conditions. East- and west-facing slopes may still be useful in certain climates or utility-rate setups, but they may require more panels to reach the same output. North-facing slopes are usually the weakest option and rarely make sense unless the property has unusual site conditions.
Pitch
Pitch affects how directly sunlight hits the panels and how well the roof sheds debris, rain, and snow. A roof angle around 30 degrees is often close to ideal in many regions because it balances summer and winter sun exposure. Steeper roofs may lose some peak summer production, but they can perform better in areas where snow or debris buildup is a concern. Flatter roofs can also support solar panels, but they may require racking systems to tilt the panels toward the sun.
The best solar-facing slope is not always the best roofing surface to disturb, especially if that area has brittle shingles, awkward valleys, poor ventilation, or limited rafter access.
Shading
Shading is one of the easiest problems to underestimate and one of the hardest to ignore after the system is installed. A tree branch, chimney, dormer, vent stack, or neighboring structure can reduce production during peak sunlight hours. Depending on the inverter setup, shade on one panel may affect more than just that individual panel. Homeowners should check the planned array area at different times of day, such as morning, midday, and afternoon, to see where shadows fall.
A good installer should be able to provide shade modeling, explain how the system handles partial shade, and adjust the layout before installation instead of giving vague answers like “it should be fine.”
Weight, Wind, and Structural Loads
The weight of a typical photovoltaic system is modest, around 2 to 3 pounds per square foot when distributed across the array footprint. Most modern truss-rafter and stick-framed roofs handle that comfortably without reinforcement. Solar thermal collectors, which heat water rather than generate electricity, weigh roughly 50 percent more per square foot and sometimes need a structural review on older homes.
Wind uplift is the bigger concern in coastal and high-exposure regions. An array adds surface area that the wind can grab, and the brackets transfer that uplift force directly into the rafters. The fix is straightforward but unforgiving: brackets must land squarely on rafters, never between them, with stainless or galvanized fasteners sized for both pull-out resistance and the timber’s capacity to hold them without splitting.
For older roof framing, especially traditional cut roofs with smaller rafter dimensions, an experienced installer will sometimes add a cleat or a steel strap alongside the existing rafter at each bracket location. That gives the bolt something thicker to grip and spreads the load. We recommend any homeowner ask their installer specifically how the brackets will be anchored and whether the existing rafters meet the manufacturer spec for the chosen mounting system. The U.S. Department of Energy publishes a homeowner’s guide to going solar that covers this evaluation at a high level for anyone wanting third-party confirmation.

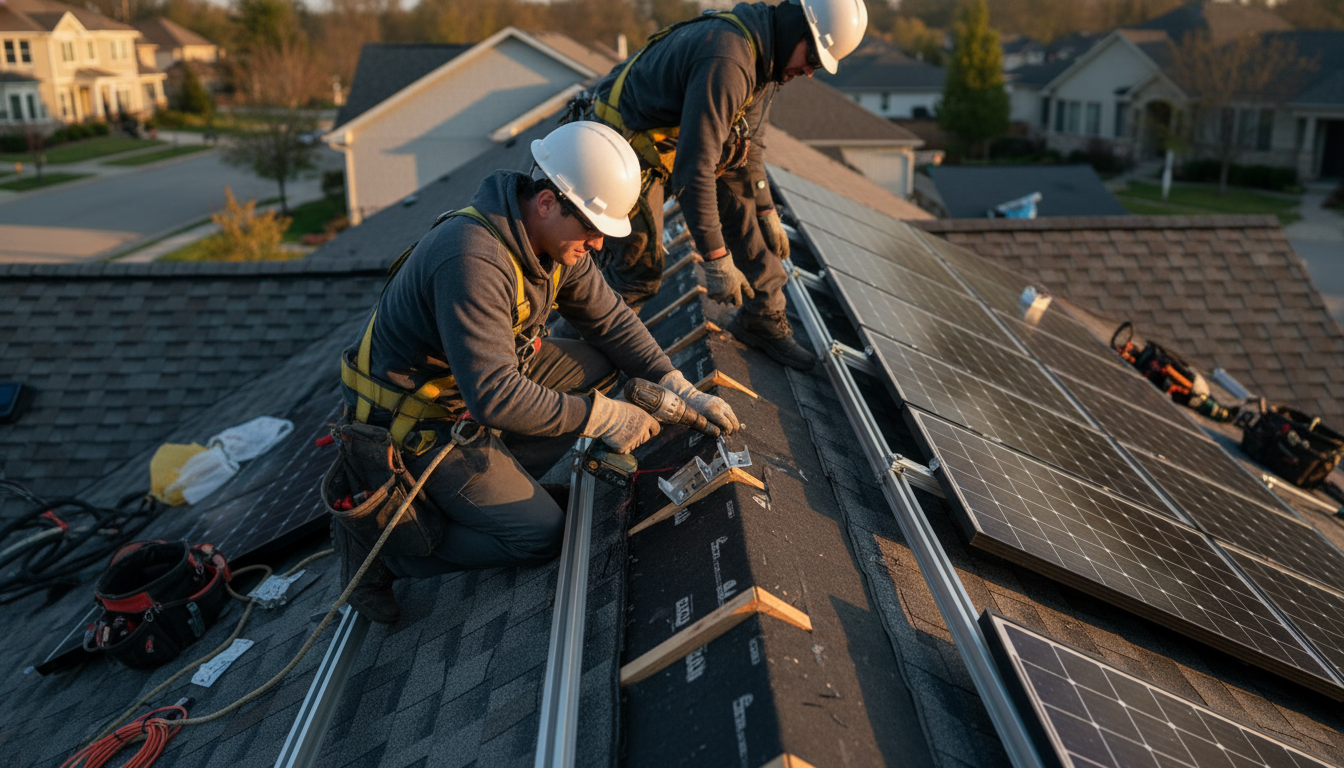
How Panels Mount Without Compromising the Roof
This is the section nobody warns homeowners about. The mounting hardware has to penetrate the weather barrier dozens or even a hundred times, and every penetration is a potential leak source for the next 25 years.
A proper installation removes shingles or tiles in a small footprint, fixes a flashed bracket directly to the rafter, then replaces the covering in a way that keeps water flowing over the bracket flashing and into the gutters. Cheap installers skip the flashing step and rely on sealant alone. That sealant cracks within a few seasons, and water finds its way to the decking. By year five, you can have hidden rot near every bracket.
Look for an installer who uses a manufacturer-engineered flashing system from a reputable hardware supplier and who can show you the cross-section of how each bracket integrates with your specific shingle profile. Asphalt shingles, tile, metal, and slate each demand different flashings. A crew that uses one universal kit for everything is cutting corners.
Fastener Spec Matters More Than You Think
Fasteners themselves deserve attention. Stainless steel or, at minimum, fully galvanized lag screws are the only acceptable options. Plain steel rusts inside the rafter within a decade and loses its grip. The screw diameter has to match the rafter thickness so it bites without splitting the wood, and it must avoid any truss connector plate that may be hidden under the underlayment. An installer who cannot tell you, in advance, exactly where each bracket lands and what fastener will be used in each one is improvising on your roof.
Three Ways to Combine Solar and Roofing
There are three accepted approaches today, and each makes sense for different homes and budgets.
Rack-Mount Above the Covering
Panels sit on rails about an inch and a half above the shingles, leaving a small ventilation gap that helps cool the panels and slightly improves output. This is the most common method and works on nearly any roof in good condition.
In-Roof (Flush) Systems
Panels replace a section of shingles or tiles and sit flush with the roof plane on a waterproof tray and flashing kit. The look is cleaner and there is no air gap to harbor leaves or debris. Costs run higher because more weatherproofing detail is required.
Integrated Solar Shingles or Tiles
These are roofing products that happen to generate electricity. They install with the rest of the covering, blend visually, and avoid the rack-mount appearance entirely. Output per square foot is lower and costs are higher, but on a custom build the aesthetics often justify the premium.
For most existing homes, rack-mount remains the right answer. For new builds and major renovations where the roof is being replaced anyway, in-roof systems and integrated solar tiles are worth a serious look. The aesthetic difference at the curb is significant.
Thinking About Going Solar in the Next Few Years?
Our team can walk your roof, assess its remaining lifespan, and tell you honestly whether to install panels now or replace the covering first. No pressure, no obligation.
Schedule a Free InspectionShould You Replace the Roof First?
If your existing roof has fewer than 10 years of useful life left, it is usually smarter to replace it before installing solar. This is one of the clearest rules in the process because solar panels can last 25 to 30 years, and installing them over an aging roof can lead to expensive removal and reinstallation later.
Different roofing materials also have different lifespans, so the right choice depends on how long you want the roof and solar system to work together:
- Asphalt shingles often last around 20 to 25 years, depending on product quality, ventilation, climate, maintenance, and installation.
- Architectural shingles and impact-rated shingles may last longer than basic three-tab shingles.
- Standing-seam metal roofing can last 50 years or more, making it one of the strongest options to pair with a long-term solar array.
For many homeowners, a solar project is the right time to upgrade from basic shingles to architectural shingles, impact-resistant shingles, or metal roofing. The goal is to match the roof’s lifespan to the solar system’s lifespan so panels do not have to be removed early for replacement.
TopCo Roofs can inspect the roof, complete any needed roof replacement first, and help ensure the home is ready before a solar installer begins work.
Coordination Saves Real Money
When a single contractor coordinates both phases, you avoid the boundary disputes that come from splitting the work between a roofer and a separate solar installer. Penetrations get flashed by people who understand the shingle they just laid. Warranties stay clean. There is no finger-pointing if a leak shows up in year three. The labor on the roof is also cheaper when only one crew is moving equipment up and down a ladder.
Maintenance, Inspection, and Long-Term Care
Once the system is installed, it is not maintenance-free. Twice-yearly visual inspections catch loose bracket fasteners, lifted flashings, and debris buildup before any of those become leaks. After major storms with hail or sustained high winds, schedule a closer look at the bracket-to-rafter connections and the flashings around each penetration.
Document everything in writing. Keep the panel manufacturer’s serial numbers, the racking system spec sheet, the roofer’s invoice, and any photos taken during installation. If a covered claim ever arises with your insurer or a warranty issue with the panel maker, that paper trail is the fastest path to resolution.
If your home was reroofed and equipped with solar in the same project, both warranties may share inspection requirements. Coordinate the two so your annual array cleaning and your roofing inspection happen in the same visit. We bundle both for clients who use our comprehensive roofing services, which is one less calendar reminder for the homeowner and one less crew on the roof every year.
Ventilation and Heat
Panels above the roof reduce heat transfer into the attic, which is good for cooling bills, but they also trap heat in the small gap between the panel and the shingle. Ventilation under the array (the air gap on rack-mounted systems) helps. In-roof and integrated systems need careful planning around attic ventilation because the covering above is now functionally airtight in those zones. A good installer accounts for this in the original design.
Insurance, Warranties, and Permits
Before installation, homeowners should contact their insurance carrier and confirm how rooftop solar affects coverage. Some insurers require documentation, system details, or policy updates. Others may want proof that the roof and mounting system were permitted and installed by licensed professionals.
Warranties also need careful review. A roofing warranty may exclude damage caused by third-party penetrations. A solar warranty may not cover roof leaks. A workmanship warranty may only apply if inspections are performed on schedule. Read those terms before installation, not after a leak appears.
Permitting requirements vary by location, but most rooftop solar projects require electrical and building review. In high-wind, hail-prone, wildfire, or coastal areas, local requirements can be stricter. Do not treat permits as paperwork. They are part of protecting the roof, the electrical system, and the home’s resale value.
Plan the Roof First, Then Install Solar
Solar and roofing should be planned together because they are two parts of the same roof system: the panels rely on the roof for support, and the roof relies on proper solar attachments to stay watertight. The best projects start by checking the roof first, including the shingles, decking, rafters, and ventilation, before designing the solar array. Installing solar on a weak or aging roof is not a smart investment; it is a future removal bill waiting to happen.
If you are considering solar and your roof has already seen a decade or more of weather, talk to a roofer before signing a solar contract. TopCo Roofs can inspect the roof, determine whether a replacement should occur first, and help you plan a roofing system that is ready for long-term solar performance.
Ready to Plan Your Roof for the Next 25 Years?
Topco Roofs has installed hundreds of roofs designed to host solar arrays. We will walk yours, give you a clear assessment, and help you sequence the work so the panels go on a covering that lasts.
Get a Free Roof Assessment